


Solara quality solar modules
Solar modules convert daylight into electrical energy with their effective technology. Solara produces particularly powerful and resistant solar modules for mobile people and self-sufficient systems.
Power supply on boats is often a capacity problem. You need electricity for the fridge, heating, instruments, lighting, etc., even if you don't run the engine or don't have a power connection. Solar panels effectively contribute to continuous battery charging, especially during the long days in summer. Electricity is produced even when the sun is not shining, because the solar modules charge even in diffuse light.
The advantages:
Silent charging without exhaust fumes.
Extends the life of the batteries.
A solar module can significantly extend the sailing time or anchorage time without charging by alternator or shore power.
A full battery at all times by charging during the week.
All Solara solar modules have poly- or mono-crystalline cells.
Helping you decide on Solara modules
Below are some tips on what you should consider when choosing your solar module.
1. calculate your energy needs
This depends mainly on your daily electricity consumption. You can use the table below to calculate your power requirements yourself. Multiply the wattage of your electricity consumption by the time in hours that your consumers are switched on each day.
Example
Consumers Power hours/day Stron consumption/day
Lamps 10 5 50 Wh/day
Colour TV 40 3 120 Wh/day
Radio 15 4 60 Wh/day
Total consumption 230 Wh/day
Once you have created this table for all consumers, select the solar module for the daily demand according to your average consumption. Bear in mind that shading and unfavourable positions of the panel in relation to the sun will reduce the output. Also, a large solar panel should not compromise safe boat handling.
2. choose the right solar panel
Now you can choose the solar panel you need for your energy requirements. The power per day (Wh/day) is indicated on all solar modules. This power is valid for a summer day in Northern Europe.
Calculation example: You have a 12 volt system on board and have calculated an energy requirement of 40 Ah/day for your boat. For this you need a solar module that delivers 480 Wh/day (40 Ah/day x 12 volts). Keep in mind that the actual output may be less, depending on how optimally the solar panel is placed. 3.
3. the correct placement
The placement of the solar module is often a compromise, because it depends on the mounting possibilities on board or on the caravan. The output also depends on this. If possible, the solar panel should be mounted at the rear on a rotating solar panel holder. Often the panel is also mounted on a rotating bracket on the railing or deck, depending on the space.
Consider the following:
The solar panel should be mounted in a place that is as sun-safe as possible. The more shade that falls on the panel, the lower the output.
The solar panel only achieves its full rated output when the sun's rays strike the panel surface perpendicularly.
Mounting on a flat surface is the best compromise, but a rotating mount has better conditions.
The panel should be protected in such a way that it can withstand loads from wind, splashing water, etc. without any problems.
Make sure there is sufficient rear ventilation to prevent heat build-up that reduces performance.
4 The right module type
Once you have calculated your energy requirements and checked the mounting options on board, you need to decide on the right type of module. Solara offers the S-series, the M-series and the K-series. The S-series and M-series are suitable for use on board, i.e. they are seawater and saltwater resistant, as well as tread-proof.
The Solara S series is for fixed installation. It is made of special tempered glass and has a sturdy aluminium frame. The S series is suitable for mounting on a solar panel holder.
The Solara M-series modules are flexible, lightweight and have an impact- and scratch-resistant EVA surface. Thanks to a stainless steel support plate, they have a high bending capacity (up to 3%). They are glued or screwed on.
5 Mounting
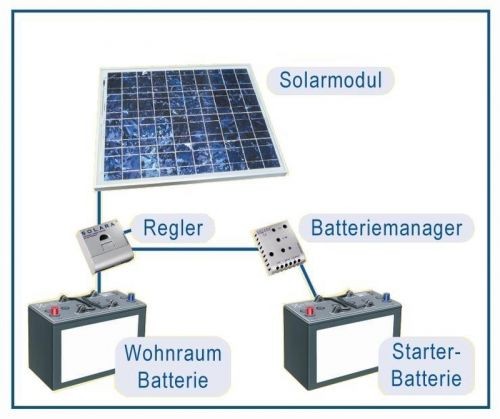
Solar modules may only be connected to the battery via a controller. Several solar modules can also be connected to one controller.
Ensure correct wiring. The integrated connection cables are UV-resistant. The connection cables have a conductor cross-section of 4 mm2. For wiring, the connection cables have pre-assembled, reverse polarity protected connectors. The solar panel may only be wired with special solar cables and suitable connectors. Only use single-core cables and ensure the correct cable cross-section to minimise voltage drop. Only use suitable cables with a minimum cross-section of 4 mm2 for further connection of the modules.
You will need the following:
Controller - The selection depends on the solar panel. If several panels are used, their power is added together and the controller is then selected according to the total power.
Battery - The Solara controllers are suitable for all battery types.
Cable - Refer to the installation instructions for the maximum recommended cable cross-section.
Deck grommet for cable
Fuse
Possibly ammeter - To measure the charge (is built into many controllers).
How to do it:
Mount the regulator as close as possible to the battery.
Run a cable through a deck grommet from the solar panel to the controller using the shortest possible route.
Connect the solar panel to the controller. Plus to plus and minus to minus.
Connect the controller to the battery via a fuse and possibly an ammeter.
Also observe the instructions in the installation manual enclosed with each solar module.
open catalogue here

Solara MC4 Y-Set - MC4 Y-Adapterset zum Parallelschalten von 2 Modulen, Plus+Minus
€23.17*
Zum Parallelschalten von 2 Modulen.